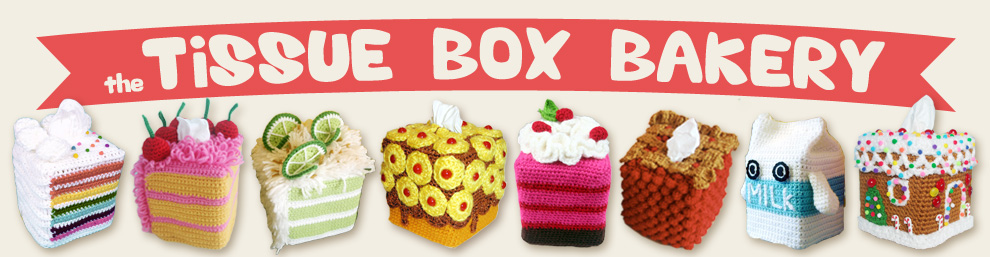
This pattern is basically the cube-shaped version of white Chiffon Cake, with the major difference being that this cozy will show the “inside” of the cake with some cake layers and frosting.
I chose Red Heart Soft for the chocolate because I think it’s a really nice, rich color. I generally prefer working with Vanna’s Choice, since I like the feel of it personally, but you really can’t beat the color here of the Red Heart Soft. I chose Deborah Norville Everyday Soft Worsted for the yellow, because it is really bright, saturated, and kind of a cartoony version of what I imagine yellow cake to be. But you can pick your favorite cake flavor and frosting flavor to work up this cozy. (You can click on photos to enlarge them.)
Ingredients
– H/8 5.0mm crochet hook or whatever is needed to obtain the correct gauge
– Red Heart Soft in Chocolate – 1 ball
– Deborah Norville Everyday Soft Worsted in Lemon – 1 ball
– 5mm rainbow pom poms and FabriTac fabric glue
– scissors
– tapestry needle
– handful of straight pins
– 5mm assorted pompoms and Fabri-Tac fabric glue
Gauge
Okay, gauge is unfortunately rather important in these projects to ensure that your cozy fits the box. My “model” tissue box is usually the cube-shaped box from Target/Up & Up. I highly recommend keeping a tissue box around, to continuously check for proper fit.
16 sc x 18 rows = 4 inches x 4 inches
Abbreviations
ch(s) =chain(s)
rnd(s) = round(s)
sc = single crochet
sk = skip
sl st =slip stitch
st(s) =stitch(es)
YO = yarn over
( ) = work everything in the parentheses into the next stitch
[ ] = repeat what is inside the brackets the number of times indicated
Special Stitches
Tall Bobble: I’m calling this a Tall Bobble because it uses a quadruple crochet stitch.
YO3 times, insert hook into next stitch, YO and pull through 1 loop. [YO, pull through 2 loops] 3 times. You should have 2 loops on your hook.
YO3 times, insert hook into same stitch, YO and pull through 1 loop. [YO, pull through 2 loops] 3 times. You should have 3 loops on your hook.
YO3 times, insert hook into same stitch, YO and pull through 1 loop. [YO, pull through 2 loops] 3 times. You should have 4 loops on your hook. YO and pull through all loops.
Chocolate Frosting (Top and Sides of Cozy)
Top
With Chocolate, ch 19.
Row 1: Sk 1st ch, 18 sc evenly across. (18)
Rows 2-10: Ch 1, turn. Sc evenly across. (18)
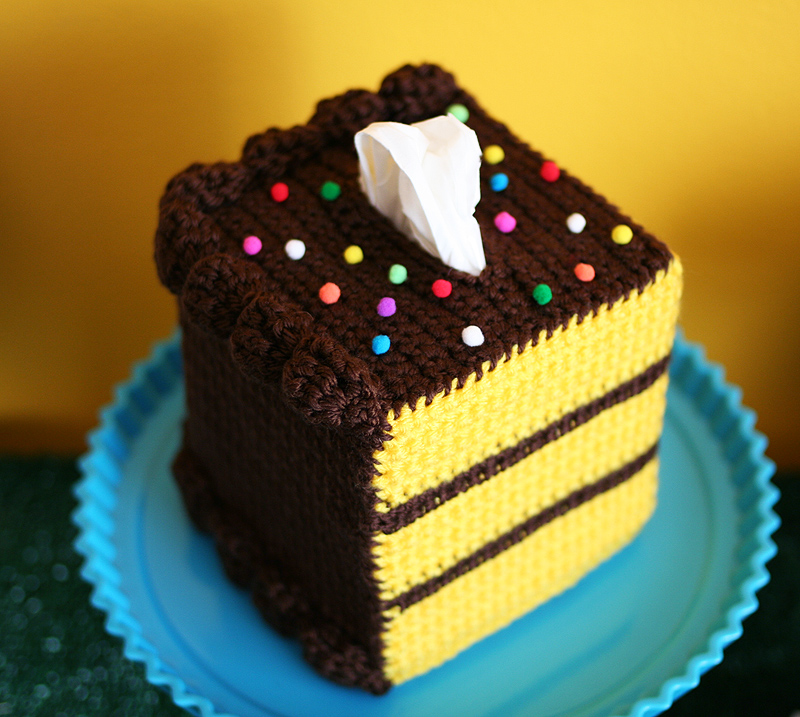
Row 11: Ch 1, turn. 4 sc, ch 10, sk 10 sts, and 4 sc, being careful not to twist your work. Your chs and sks create the hole for your tissue to come out. (18)
Rows 12-20: Ch 1, turn. Sc evenly across. (18) Don’t break off.
You should have a square, with a slit in the middle for the tissue, that fits on top of your tissue box. To work the two sides of your cake, you’ll be working in rows along the sides of your square.
Sides
Row 1: Without turning your work, ch 1 and work 20 sc (1 sc for each row along the Top). Then work 18 sc evenly along the next edge. (38)
Rows 2-23: Ch 1, turn. Work 1 sc in each stitch. (38) Break off, leaving about a yard of yarn for sewing later. Weave in the other end.

Cake Layers
You’ll be creating the next 2 sides of the cozy with 3 layers of yellow cake and 2 chocolate stripes.
With Lemon, ch 39.
Row 1: Sk 1st ch, work 38 sc evenly across. (38)
Rows 2-6: Ch 1, turn. Work 38 sc evenly across. (38) Drop Lemon (no need to break off) and Join Chocolate.
Rows 7-8: Ch 1, turn. Work 38 sc evenly across. (38) Break off Chocolate and pick up Lemon. You’ll see a little bit of the Lemon yarn traveling up the side of the rows, but you can hide this when you sew the whole cozy together.
Rows 9-14: Ch 1, turn. Work 38 sc evenly across. (38) Drop Lemon (no need to break off) and Join Chocolate.
Rows 15-16: Ch 1, turn. Work 38 sc evenly across. (38) Break off Chocolate and pick up Lemon.
Rows 17-23: Ch 1, turn Work 38 sc evenly across. (38) Break off and weave in ends.
* Fit the Cake Layers against your tissue box to see if it fits properly. I had to work one more row of Lemon to make mine fit properly. Sometimes, even if the math is perfect, the project still might need some tweaking. Don’t sweat it!

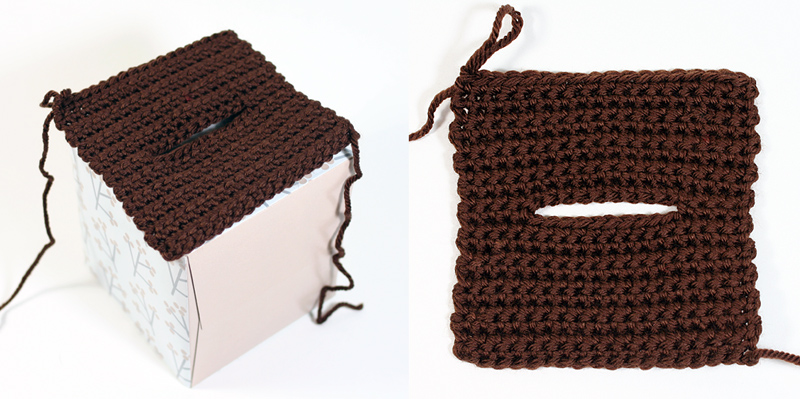
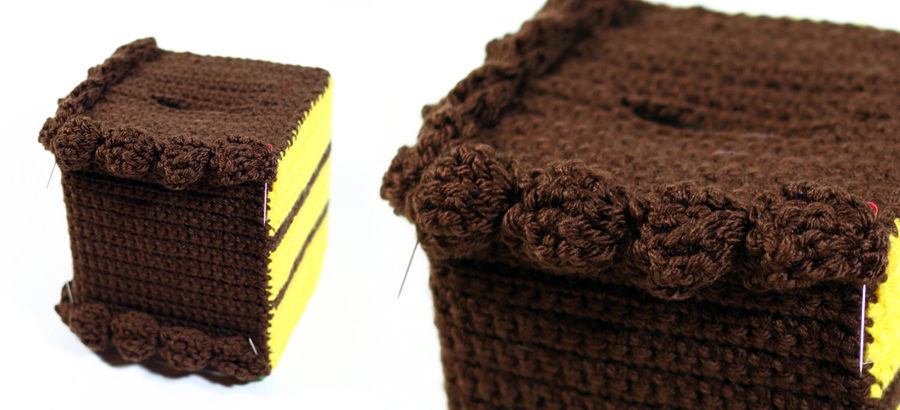
Piped Frosting Trim (make 2)
With Chocolate, ch 3.
Row 1: Sk 1st ch, 2 sc evenly. (2)
Row 2: Ch 5, turn. [Tall Bobble] 2 times. (2)
Row 3: Ch 1, turn. 2 sc. (2)
Repeat Rows 2 & 3 until you have enough Frosting Trim to fit around the top, chocolate frosted side of your Cozy. Be sure to complete a Row 3 before breaking off, leaving an arm’s length of yarn for sewing. For the top of this Cozy, I ended up working 8 rows of Tall Bobbles. 4 fit on each edge.
The second Piped Frosting Trim will be for the bottom of the frosted side of your Cozy.
Assembly
1. Put Chocolate Frosting on your tissue box and pin Cake Layers to Chocolate Frosting. Sew the pieces together with the long yarn tail you left on Chocolate Frosting.
2. Pin 1 Piped Frosting Trim along the top edge of your cake and pin the 2nd Piped Frosting Trim along the bottom. Sew these down with the long yarn tail you left. To preserve the puffiness of each Bobble, I usually stitch down the Trim (with two stitches) between the Bobbles and allow the yarn travel invisibly inside the cozy where there is a Tall Bobble.
3. Glue on your rainbow sprinkles and enjoy!
*The instructions and photos on this page are copyright 2013, Twinkie Chan Inc. They are intended for personal use and for sales from which most of the proceeds go to a charitable organization.


can’t wait to make these.
this is a wonderful gift to give my Granddaughters! I am excited about crocheting each of them one.
this is my favorite cake and will make it as soon as I get all the materials.
Pingback: 20 Free Crochet Patterns Perfect for Birthday Parties! • Oombawka Design Crochet
Pingback: To Chocolate or Not To Chocolate – My Yarntastic Adventures
Great pattern! Using 4 ply, it was a little too too large though. I reduced the first chain by 2, reduced the top by 2 rows, and adjusted the other amounts accordingly. I also added a chain of different lengths, between the large bobbles on the top icing, and slip stitched back to the starting point, to make the icing look like it is running down the side. Looks great!!
I just switched to a G needle fits perfect
I love this project already.
The colors stood out more than any other cake patterns.
Looking forward to making it for my desk.